Saturday, September 28, 2013

Swimming Noodle Flowers


I've been trying to spice up my home without adding paint to the walls. (this is a rule we are enforcing since in 3 to 4 years we will probably be on the move again and it's easier to sale a home with untainted walls). So for the girls bathroom we made some awesome hot pink and bright orange flowers using swimming noodles. These were so easy to make and look amazing. Every time my Olivia (4-years old) walks into the bathroom she ooo's and awww's at her beautiful flower wall and shouts "oh mom, I love it"!

What you need for this project: Swimming noodles, I would say at least two colors but you can use whatever floats your boat.  A sharp knife, sewing cutting mat with measurements and a glue gun. Tape or nails to put flowers on the wall.

I cut my flowers 1 inch thick and the center a half inch. Once all your petals and centers are cut use your glue gun to stick everything together. If your glue gun allows you to heat it up on a low setting do this! I learned from experience that if the glue's too hot it will melt the noodles instead of gluing them together.

Once your five petals are attached add glue to the outside edge of your center piece and press down for a few seconds to ensure it's in place.

Final step is adding them to the walls. You can place them however you want. We went for a pattern but the sky's the limit! I used heavy duty clear tape to put these on the walls, you could also stick a nail in the wall and hang them.

This is a fun, inexpensive way to add a little flair to any boring wall! Enjoy! :)

Cardboard Keys


I think most people have experienced running behind schedule. In my case we usually include frantic searches for every lost shoe, missing Elmo, stuffed bear, action figure or barbie doll. Leading to me sternly buckling my heathen children into their car seats.  Only to hear the phrase "I need to use the potty", which leads to rushing back into the house and repeating the buckling step once again. Only to sit down in my vehicle to realize I can't find my keys. I'm pretty certain most mom's can relate to this scenario. 

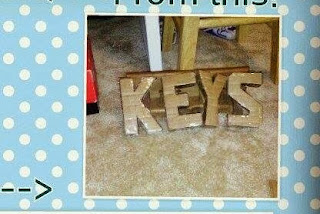
I decided I needed a designated location for my keys, which led to craft project #2: Cardboard letters spelling Keys!

I love saving money and crafting on a small budget. I could have used my money to buy letters, but I'd seen cardboard letters done before on Pinterest and decided if they can do it so can I. 

For this project I used a cardboard from a diaper box, tape, glue gun, scrapbook paper, brown craft twine, exacto cutter or scissors, a ruler, sewing measuring mat, and other embellishments such as buttons, ribbon and flowers.  

Using my sewing mat I decided each letter would be 5 inches tall and 3 inches wide at its widest point. You can get creative with the shape of your letters, but I found the boxy letters seem to work the best. I used my ruler to measure out each letters thickness of 1 inch. Once I cut out 1 set of each letter, I just traced the second set so I didn't have to get the ruler out again. 

Once both sets are cut out you need to measure and cut 1 inch strips that will go in between your front and back letters. They can be as long as you want, just needs to be 1 inch in width. Using tape and glue connect your letters. Depending on if you want your letters to be curvy or sharp looking you can either keep the 1 inch strips connected throughout the whole process or cut the exact length of each angle. This is probably the hardest part of the whole project so be patient. 

Once the letters are made you can decorate them as you wish. I love using twine and/or yarn. They seemed to cover the cardboard the best and were very forgiving to oddities in the letters shape. Use a glue gun to wrap the ends of your letters first then glue and wrap the rest. 

Scrapbook paper was a little harder. I placed the letters on a large sheet of my desired colors and cut a very exaggerated letter to cover the cardboard. As seen below I added twin on the "E" around the edges. I had to do this to cover where the papers edge was. Thankfully it added some cute individuality to that letter. I also wrapped the "Y" in the middle to cover odd paper placement. 

These can be decorated anyway your heart desires. Make it your own and never loose your keys again!  

Friday, September 27, 2013

Home of the Free because of the Brave Reclaimed wood sign


In the past two weeks since Jason has deployed I've become a craft addict. I'm taking the first step and admitting I have a problem. But since he won't be home for another 6-ish weeks I figured I may as well share my new found enjoyment. Hence we now have Cole's Crafts! I am Nichole, my instructions may not be entirely discernible or make any sense what-so-ever, but we're going have a go at it!

Over the last several weeks I've wanted to get my hands on some old wood. I didn't want to buy distressed wood, but I also wasn't having any luck finding it until yesterday. I was driving home from picking my 4-year old up from school when I noticed in front of a home being built just down the road, a whole fence had been torn down and put in the discard pile. There were also many more treasures just waiting to be disposed of. I naturally loaded my car up with all sorts of goodies including several 2x4's, pallets, fence posts, and random slabs of wood. It was a craft addicts dream come true.  

Since my husband left, I have been working on making our craft/computer room into a patriotic shrine to display all of his plaques and awards from his service thus far in the Marine Corps. Cue craft project #1- Home of the Free - Because of the Brave reclaimed wood sign. 

I began by choosing two nail free, sorta sturdy, fence posts. Each started out 6 feet in length but I didn't quite want my sign that long so I shorten them in true Tom-girl fashion by stepping on the board where I wanted it to break and pulling up hard on the end therefore snapping the board and giving me awesome splintered edgers. To make my sign 6 inches high I nailed two boards together. I just used small scraps of wood to act as stabilizers in the back. 

Once everything was nailed together, I wiped the board off so it would have a cleaner surface then started to paint. I didn't want a solid color so I added water to my navy paint. I lightly brushed the color on so the gains of the old wood would show through. 

While the paint was drying I cut out my "home of the free - because of the brave" vinyl using my cricut. Something I did not know at this point in time was vinyl hates old wood! It does not want to stick to it and if you try to make them hang out together it will frustrate you severely! So you ask, what is there to do? I choose to put a light coat of modge-podge over my entire board after I put the non-sticking sticky vinyl letters on. This worked wonderfully and really put the finishing touches on this project. There are probably better thing to do, but that's what I did and it worked so I'm not complaining!  

Final touches include adding two saw tooth hangers and she's ready to go on the wall! 

Add caption
I haven't quite got mine on the wall yet, I need to finish another project first. 
More fun to come!